INFORMATION SHEET
PROJECT TITLE Project No; 3
Half Brick Wall Quoin with a Stop End Return CORE
1 of 8
Setting Out Right Angles with a Builders Square
Builders Square.
The Builders square is used for setting out right angles.

When made, its accuracy could be guaranteed, out over time when exposed to site conditions its accuracy should be questioned.
It is constructed of 75mm x 30mm timber, half jointed at the 90° angle with a diagonal cross brace tendon into its side length.
It can be used in conjunction with a thin mortar screed spread on the floor into which cuts are made with the trowel blade.

It can also be used using ranging lines or a chalk line which are line up
with the sides of the square.

Greater accuracy can be achieved if the length of the sides of the square is increased.
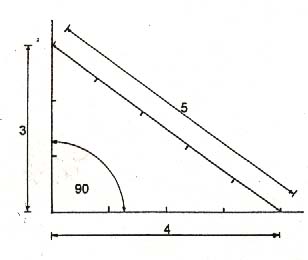
Setting Out Right Angles using the 3:4:5 Method.
The 3:4:5 Method
This method of setting out right angles is based on the Pythagorus theorem for right angles triangles. It is commonly referred to as the 3:4:5 method.

 In practice this can be achieved by using a tape measure and timber pegs.
It can also be used to check the accuracy of a builders square or door and window frames which have been distorted prior to building them in.
Gauging Brickwork
Gauge.
Gauge is the name given to the combined depth of a brick plus the bed joint.
If a 10mm joint is used with a 65mm brick the gauge would be 65mm + 10mm = 75mm.
This would give you the standard gauge of four courses to 300mm.
It may become necessary to vary the thickness of the joints as other facts have to
be taken into account, e.g. the height of door and window frames.

Gauge Rods.
The gauge is maintained throughout the height of the wall by the use of a gauge rod.
This is made from a length of timber approximately 50mm x 36mm.
 The depth of each course (brick depth plus bed joint) is marked on to the gauge rod with a pencil, but it is good practice to convert the pencil marks into shallow cuts. Over a period of time the weather would remove the pencil marks. (See fig 3g.)
Erecting Corners
One of the essential qualities of good brickwork is the accuracy of its quoins or corners.
They must be accurate on the vertical and horizontal planes in relation to datums and units that are to be built into the wall lengths.
Sequence of Erecting a Corner.
Right angle is set out using builders square and cement screed.
 The corner brick is then bedded to the gauge.
 The corner is then dry bedded and the end bricks bedded and levelled into the quoin brick.
The intermediate bricks are then bedded, levelled on the top surface and aligned on the face of the bricks.

 This sequence should be followed throughout the corner with each course being set to gauge, levelled and plumbed on both returns.
The extreme odds of the returns should then be checked for alignment down the line of racked back courses.
Methods of Jointing Brickwork.
Jointing.
Jointing is the term used when the mortar joints are finished as the work proceeds. When it is carried out will be determined by the type of brick being and mortar being used.
The main object of jointing is to seal the surface of the mortar joint to prevent the penetration of moisture which could lead to dampness on the internal face of the building.
Apart from increasing the durability of the wall it also improves the general appearance of the brickwork.
Types of Joint Finish.
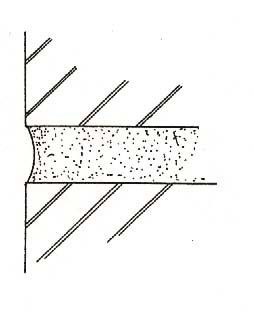
Half Round Tooled Joint.
 This joint is produced by ironing the joints with a rounded jointing iron. It is referred to as a bucket handle joint which originated from the use of galvanised bucket handles to achieve the joint.
Weather Struck Joint.
Produced by ironing the joint with a pointing trowel, pressing the upper edge of the jointer back behind the arris of the brick.

The outward slope of the joint runs moisture away from the joint.
Flush Joint
As the name indicates the joint finishes flush with the brickwork.
 It can be achieved by rubbing the joint with a short length of rubber hose or a bull nosed length of timber, although this, if not carried out correctly, can give a slightly rounded surface to the joint.
On internal surfaces, if it is to be decorated, it can be achieved by rubbing with a sack cloth.
Recessed Joint
This joint is NOT recommended for external walls as moisture can be trapped on the lower surface of the joint.
 It is achieved by raking out the mortar joint with a chariot recessing tool or by making a recessing gadget using a piece of timber and a nail.
Some specifications will ask for the face of the joint to be trowelled.
Struck Joint
 Used mainly on inspection chambers where the joint has to be formed overhand from outside the chamber.
NOT suitable for external use as the base of the joint will hold water.
